
Properly zeroing the infrared (IR) laser on your firearm is essential to ensure accuracy. This quick guide covers the basics behind How to Zero Your IR Laser device, allowing you to align the laser with your optic for reliable performance in various conditions. Follow this simple step-by-step guide to zero in your IR laser.
A Step-by-Step Guide: How to Zero Your IR Laser
Equipment You Need
- IR laser-equipped firearm
- Allen wrench set
- Target (paper or steel)
- Shooting bench or tripod
- Eye and ear protection
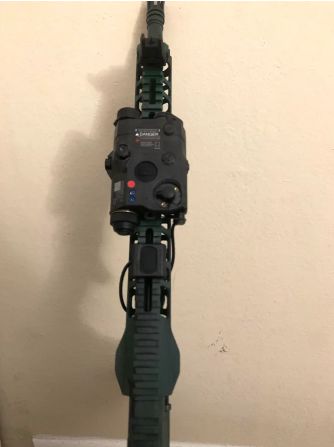

Step 1: Mount Your Firearm
Rest your firearm securely on a bench, tripod or solid surface roughly 50 yards from your target. This provides a stable base for accuracy when sighting in the laser and learning how to zero your IR device properly.
Step 2: Co-Witness the Laser with your Optic
If your optic (red dot or scope) is already zeroed, “co-witnessing” them together saves time. Activate the IR laser and project it onto a wall or flat surface in a darkened space. Now align it under the lit reticle of your optic. Use the adjustment screws on the laser with the Allen wrench to centre it.
Step 3: Establish a Constant Offset Zero (if desired)
Dial in a fixed vertical and horizontal offset between the IR laser and optic bore for more precision at longer distances. First, deactivate the laser and draw a dot marking its location. Now, place a dot to represent the bore by tracing your suppressor. These two dots show the natural offset.
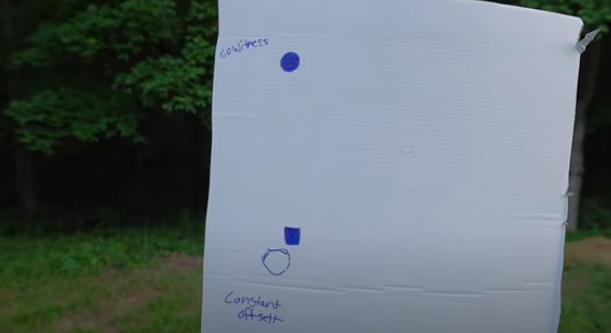
Step 4: Set Up Your Target
Head down and set up a primary target with clearly defined aim points. For example, draw a dot or use white paper for the IR laser to stand out against. Then, draw a circle representing your optic’s zeroed point of impact. This will give you distinct visual references when going through how to zero your IR laser.
Step 5: Roughly Zero at Your Target
Return behind your bench/tripod and activate your IR laser. Project the laser onto your aim point on the target. Now fire a 3-5 round group without adjusting anything to establish a baseline. The laser may not be aligned with the optic at this point.
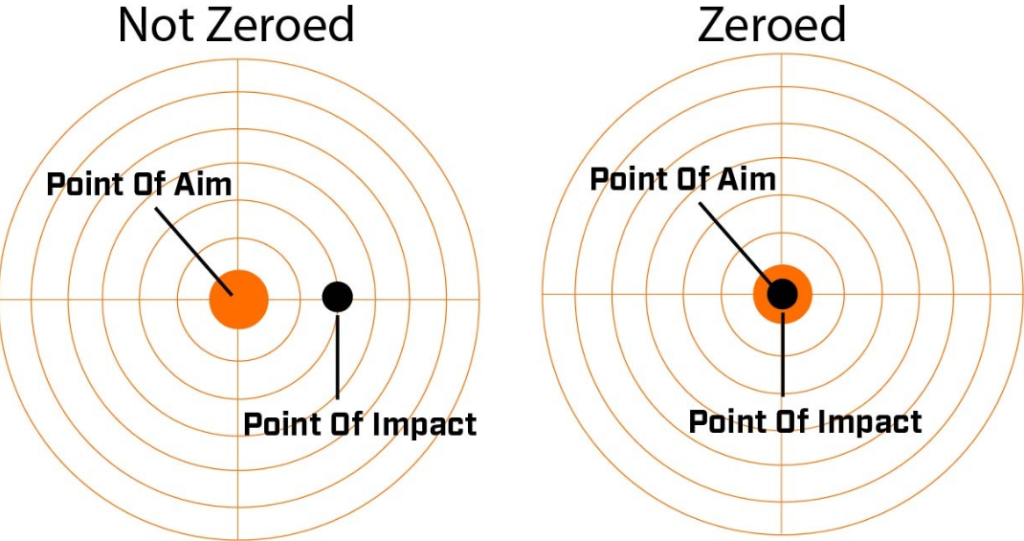
Step 6: Analyze and Adjust
Inspect the shot group on the target and determine how far off it is from your optic’s zeroed point of impact. Now carefully adjust the IR laser’s screws to walk it onto that point of impact, which is a crucial part of understanding how to zero your IR laser. Fire another group to confirm or continue adjusting as needed.
Step 7: Confirm Zero
Once your groups consistently land inside the point of impact, your IR laser and optic are properly co-witnessed and zeroed through the correct completion of the how to zero your IR process. Confirm this by deactivating the laser intermittently while aimed at the target. The aim point should remain centered.
Consideration while zeroing
- Ensure proper eye relief from optics when firing
- Use lower laser brightness settings in dark conditions
- Reconfirm zero if adding/removing accessories
- Consider environmental factors that influence IR lasers
How To Zero IR With Constant Offset Method
Zeroing an IR laser is like getting your aim right with a regular sight. You want to ensure that where you’re aiming is precisely where your shot hits, especially when dealing with things like bullet drop. But IR lasers have an extra challenge – they can be a bit off to the side to avoid getting blocked by other parts of the gun.
The Problem with the Old Way of Zeroing
In the early 2000s, people used zero IR lasers by lining them up with the gun barrel. It’s like ensuring the laser is perfectly above and to the side of the barrel. The problem with this method is that it needs to consider how the bullet drops over a distance. So, if the laser is 1 inch above and 1 inch left of the barrel, it stays that way no matter how far you shoot. This doesn’t work well for guns used in severe situations.
Misunderstanding Close-Range Aim and Impact
Some folks also tried to zero the lasers by aiming and hitting targets up close, like 25 meters or less. But this must be corrected in figuring out how much the bullet will drop over longer distances. It also makes the laser shift its position strangely as you shoot farther. For example, if the laser is 1 inch to the right and you zero it at 25 meters, it’ll end up 1 inch to the left at 50 meters, 3 inches left at 100 meters, and so on.

Why ‘Close Enough’ Doesn’t Work
Some innovative groups thought Both ways to be ‘close enough,’ but that’s a problem when you need to be super accurate. It should be okay until you hit a target precisely. Imagine if being a little off means your shot hits something else instead of the target you’re aiming for! That’s not good, especially when dealing with serious challenges or trying to protect someone. So, our rule is clear – ‘close enough’ is not good enough to get your aim just right. Being precise is super important, and using the proper methods to line up your IR laser can make a massive difference in critical situations.
Now that you know the basics for how to zero your IR laser, you can keep it dialled in for reliable performance. You may also like to read our comprehensive buyer’s guide for Glock laser light.
Here, you can find some IR lasers of the HOLOSUN Compact IR Laser of Weaver Mount.
Bottom Line:
This process will correctly align your infrared laser with your firearm’s optics. This provides excellent capability when operating in low-light conditions. Always confirm that your system maintains zero by safely test-firing at various distances and positions. Consistent practice creates instinctive shooting skills and laser accuracy.
FAQs:
How Far Should You Zero an IR Laser?
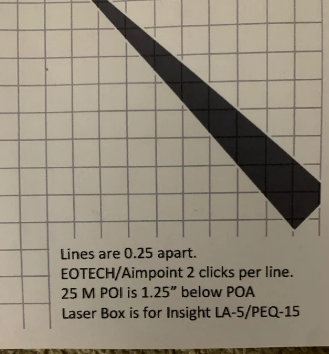
For optimal results, complete the IR laser zeroing process using our targets. Afterwards, perform a live fire zero at your intended distance, typically 200m. If adjustments are necessary, retest using our 25m target and record the point of impact for precision in your shooting setup.
Do I need night vision for an IR laser?
Enhance your IR device by pairing it with an illuminator. Like a flashlight, an IR illuminator emits a beam to enhance visibility in low-light conditions, complementing your night vision device for optimal performance.
How do IR Lasers work?
Infrared (IR) Lasers by Seminex utilize advanced technology to aim laser light at objects and measure emitted electromagnetic radiation. Ideal for situations where traditional thermometers are impractical, IR lasers are perfect for measuring temperatures in scenarios like car engine diagnostics or monitoring food on a grill with precision and safety.